| Základní informace pro práci s mapovým oknem |
-
základní ovládání mapového okna lze provádět pomocí ikon nalézajících se v levé horní části mapového okna (níže jsou ikony vč. jejich funkcionality popsány), v mapovém okně se dále nachází žebřík pro změnu měřítka mapového výřezu,
-
v horní liště nad mapovým oknem se nachází nástroje pro načítání a ukládání mapových kompozic, výstup do tisku, aktuální souřadnice kurzoru nad mapou a odkaz na aktuální mapu pomocí URL adresy.
Ikony mapového okna
Ikony v mapovém okně poskytují uživateli základní funkcionalitu pro práci s mapou jako je posun, změna měřítka nebo přepínání mezi leteckými snímky a topografickým podkladem.
 - posun - tažení levého tlačítka myši; zvětšení – přidržením klávesy Ctrl a označení oblasti ohraničujícím obdélníkem pomocí myši,
 - krok vpřed - pokud byl udělán krok vzad, vrátí na původní hodnotu měřítka a zobrazené oblasti v mapovém okně,
 - krok zpět - pokud byl udělán krok vpřed, vrátí na předchozí hodnotu měřítka a zobrazené oblasti v mapovém okně,
 - nástroj pro tvorbu uživatelské grafiky - pomocí nástrojů uživatelské grafiky lze vytvářet a editovat body, linie a polygony. V panelu „Info“se zobrazují délky resp. plochy a popisky jednotlivých prvků. Nástroje uživatelské grafiky jsou následující:
 - výběr prvku uživatelské grafiky - umožňuje editovat nakreslený prvek uživatelské grafiky,
 - posun prvku uživatelské grafiky - umožňuje posunout prvek uživatelské grafiky,
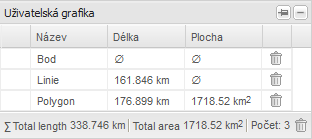
 - nakreslit bod - informace o bodových prvcích jsou zobrazeny v panelu "Uživatelská grafika",
 - nakreslit linii - informace o liniových prvcích jsou zobrazeny v panelu "Uživatelská grafika",
 - nakreslit polygon - informace o plošných prvcích jsou zobrazeny v panelu "Uživatelská grafika",
 - dotaz na vrstvy zobrazené v mapě - informace, včetně souřadnic bodu, se zobrazí v panelu "INFO",
 - detail parcely z Katastru nemovitostí - kliknutím do mapy je proveden dotaz do katastru nemovitostí (otevře se nové okno prohlížeče "Nahlížení do katastru nemovitostí" s informacemi o parcele, nad kterou byl proveden dotaz).
Tvorba mapových kompozic
Registrovaní uživatelé mají možnost na geoportálu vytvářet a ukládat mapové kompozice. V nich je uložena informace o rozsahu mapového okna, zobrazených vrstvách a jejich nastavení.
 - Vytvořit novou mapovou kompozici - vymaže všechny uživatelské vrstvy z mapového okna,
 - Otevřít mapovou kompozici - umožňuje nahrání vlastní mapové kompozice ve formátu WMC,
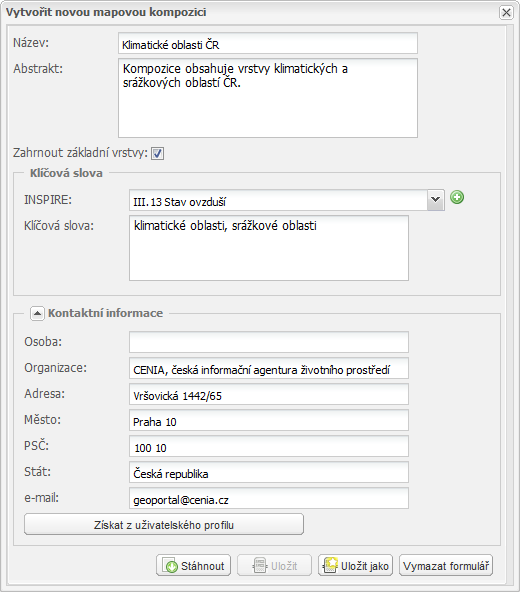
 - Uložit mapovou kompozici - je otevřeno dialogové okno pro uložení aktuální mapové kompozice. Je zapotřebí vyplnit položku "Titulek" a "Abstrakt". Ostatní pole jsou nepovinná. Registrovaný uživatel má možnost ukládat svoje mapové kompozice na geoportál. Potom jsou jeho kompozice umístěny v panelu "Mapové kompozice" - záložka "Moje".
Možnosti dialogu jsou:
-
Stáhnout – WMC soubor mapové kompozice se uloží na Váš disk,
-
Uložit – uloží aktuální mapovou kompozici,
-
Uložit jako – mapová kompozice se uloží pod novým jménem,
-
Vymazat formulář - položky formuláře se vyčistí.
Tisk
Tiskový modul umožňuje vytištění nebo uložení do souboru aktuálně zobrazené mapové kompozice. Parametry tisku si může uživatel upravit přímo v tiskovém modulu.
Po kliknutí na ikonu  v levé části horní lišty nad mapovým oknem je spuštěn v novém okně internetového prohlížeče tiskový modul. Ten umožňuje volbu parametrů tisku a typu výstupu, které se nastavují v horním ovládacím panelu tiskového modulu.
Nastavení parametrů tisku:
- volba formátu výstupu - nastavení umožňuje tisk na formáty A3 a A4 na výšku i šířku,
- nastavení měřítka mapového okna - zadáním číselného měřítka nastavíte měřítko mapového okna,
- zobrazení mapového okna - nastavení umožňuje vypnutí mapového okna (v případě že uživatel chce vytisknout samostatně legendu zobrazovaných vrstev),
- zobrazení legendy - nastavení umožňuje zahrnout legendu do tištěného mapového okna, legenda se zobrazí pouze pokud je poskytována zdrojovou mapovou službou,
- název mapy - přepsáním výchozího textu "Mapa" může uživatel zadat vlastní název tištěné mapy.
Volba výstupního formátu:
 - vytisknout - vytiskne aktuální mapovou kompozici,
 - uložit jako obrázek PNG - vygeneruje obrázek ve formátu PNG,
 - uložit jako GeoTIFF - vygeneruje georeferencovaný soubor ve formátu TIFF.
| Pokročilé funkce pro práci s mapovým oknem |
Pro práci s mapovým oknem lze využít také pokročilé funkce, které se nalézají v rozbalovacích panelech v pravé části stránky. Panely jsou členěny na:
Vrstvy
Panel obsahuje seznam podkladových vrstev, které tvoří základní mapovou sestavu mapového okna. Dále jsou zde obsaženy vrstvy přidané z mapových kompozic nebo připojených webových služeb. Všem vrstvám lze nastavit viditelnost, průhlednost a lze měnit jejch pořadí.
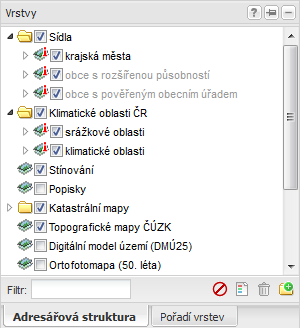 Seznam v tomto panelu obsahuje vrstvy, které jsou součástí mapové kompozice mapového okna. V základním seznamu jsou obecně užívané vrstvy, které nelze smazat.
Přidávání vrstev - základní seznam je možno dále rozšiřovat. V panelu "Mapové kompozice" lze dvojklikem přidat ze seznamu dalších existujících mapových kompozic nebo lze přidat vlastní externí mapovou kompozici pomocí některých služeb OGC (WMS, WFS, ...) v panelu Připojit službu.
Adresářová struktura - tato záložka umožňuje tematické seskupení vrstev, toto nastevení neovlivní pořadí v jakém se zobrazují v mapovém okně.
Pořadí vrstev - tato záložka umožňuje nastavit pořadí vrstev, ve kterém se mají zobrazovat v mapovém okně.
 - ikona vrstvy,
 - ikona dotazovatelné vrstvy, která vrací atributy pomocí nástroje
  ,
,
Filtr - pomocí textového řetězce lze vyfiltrovat požadované vrstvy ze seznamu vrstev,
 - skrýt viditelné vrstvy - je zrušena viditelnost všem viditelným vrstvám,
 - zobrazit legendu pro viditelné vrstvy - je zobrazena legenda všech viditelných vrstev,
 - odstranit vrstvy přidané do mapy - jsou odstraněny všechny přidané vrstvy,
 - vytvořit novou složku - je vytvořena nová složka v seznamu vrstev.
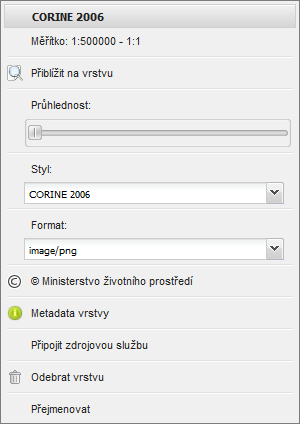
Detail vrstvy - Kliknutím na název vrstvy je zobrazeno dialogové okno s nastavením vrstvy.
-
informace o měřítkovém rozsahu, při kterém je vrstva viditelná,
-
přiblížit na vrstvu - zoomovací funkce pro přiblížení na vybranou vrstvu,
-
posuvník pro nastavení průhlednosti vrstvy,
-
výběr ze seznam stylů (WMS), pokud jsou k dispozici,
-
výběr ze seznamu rastrových formátů (WMS),
-
informace o zdroji dat,
-
link na metadata vrstvy,
-
odebrat vrstvu (pokud je to dovoleno),
-
funkce pro přejmenování vrstvy.
Info
Panel slouží pro zobrazení dotazu na prvky v mapě jako jsou atributy vrstev a souřadnice bodu.

V tomto panelu se zobrazují výsledky dotazů na prvky v mapovém okně. Ikony pro dotazování
se nalézají v levém horním rohu mapového okna.
 - dotaz na vrstvy zobrazené v mapě - zobrazí informace o vrstvách v mapovém okně v tomto panelu.
Panel obsahuje následující informace:
-
atributy dotazovatelných vrstev (tyto vrstvy jsou označeny ikonou  ),
),
-
souřadnice bodu (JTSK, JTSK pro GIS, WGS84).
Mapové kompozice
Panel obsahuje seznam mapových kompozic, veřejných i Vámi vytvořených, a uložených na geoportálu. Veřejné mapové kompozice jsou strukturovány podle základního členění nebo je lze uspožádat podle témat INSPIRE.
V panelu Mapové kompozice se nacházejí předdefinované mapové kompozice, které lze vkládat do
mapového okna.
Třídění kompozic:
Přidávání mapové kompozice do mapového okna:
1. Kliknutím na položku v seznamu kompozic se zobrazí dialogové okno,

2. "Přepsat mapu" – jsou vymazány všechny stávající vrstvy z mapové kompozice a jsou nahrazeny zvolenou mapovou kompozicí,
3. "Přidat do mapy" – zvolená mapová kompozice se přidá k zobrazeným vrstvám,
4. "Storno" – ruší zvolenou akci (nic neproběhne),
5. vrstvy obsažené v přidané mapové kompozici se zobrazí v seznamu vrstev panelu "Mapy".
Připojit službu
Panel slouží k připojení externí služby standardu OGC jako je např. WMS služba. Služba musí podporovat souřadnicový systém S-JTSK (EPSG:5514), ve kterém jsou zobrazovány vrstvy v mapovém okně.

Tento panel slouží k připojení externí OGS služby jako je např WMS nebo WFS.
Připojit službu:
1. do pole URL vložte adresu požadované služby,
2. v seznamu podporovaných OGC služeb vyberete typ služby,
3. klikněte na tlačítko "Spojit".
Parametry služby:
Jsou načteny parametry služby. Pro WMS jde o:
-
formát obrázku (png, jpg, tiff, ...),
-
formát dotazů pomocí "Info",
-
seznam podporovaných souřadnicových systémů,
-
možnost dlaždicovat s nastavením velikosti dlaždice,
-
možnost vytvořit složku, do které se vrstvy služby vloží,
-
seznam vrstev služby s možností výběru pro zobrazení v mapě.
Přidat službu do mapy:
1. Zaškrtnutím políčka před názvem vrstvy vyberte požadované vrstvy. Tlačítkem "Vybrat vše" lze vybrat všechny vrstvy najednou.
2. Klikněte na tlačítko "Do mapy".
3. Označené vrstvy se zobrazí v mapovém okně a v seznamu vrstev v panelu "Vrstvy" na horní pozici.
Georeporty
Panel obsahuje seznam zveřejněných georeportů. V kombinaci s mapou lze z tohoto panelu zahájit generování vybraného georeportu.
 Georeporty jsou nástrojem pro vytváření dokumentů obsahujících řešení konkrétní životní situace vztahující se k určitému místu. Pro uživatele zobrazují popis a řešení vybrané životní situace vč. adresy státní instituce, se kterou lze životní situaci řešit.
Pro standardního uživatel geoportálu je seznam přístupných georeportů dostupný v mapovém okně v pravém panelu jako poslední položka. Obsahuje:
-
filtrovací pole, kde lze vybrat konkrétní INSPIRE téma - podle vybrané položky je vyfiltrován seznam georeportů, které do daného tématu spadají,
-
samotný seznam georeportů,
-
lištu ve spodní části obsahující nápovědu během generování a tlačítko "Spustit". Toto tlačítko je přístupné jen pokud je jeden z georeportů vybrán.
Generování Georeportu:
1. Uživatel klikne na georeport, který chce generovat - daný georeport je označen.
2. Dále klikne na tlačítko "Spustit" ve spodní části panelu - takto je vybraný georeport aktivován.
3. Nyní v mapě klikne na místo, ke kterému se životní situace vztahuje - je zobrazen dialog, který obsahuje seznam parametrů pro vybraný georeport.

4. Uživatel nastaví parametry daného georeportu a potvrdí tlačítkem "OK".
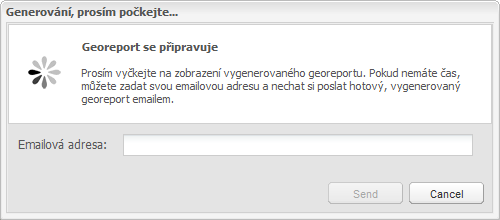
5. Je zobrazen dialog informující o generování georeportu s možností zadaní emailové adresy, na který se má vygenerovaný georeport zaslat. Pokud je georeport vygenerován, potom je zobrazen ve formátu PDF.
Uživatelská grafika
Panel zobrazuje názvy prvků, délky linií a rozlohy polygonů nakreslených pomocí nástrojů uživatelské grafiky.
 - nástroj pro tvorbu uživatelské grafiky - pomocí nástrojů uživatelské grafiky, které se nalézají v mapovém okně, lze vytvářet a editovat body, linie a polygony. V panelu „Info“se zobrazují délky resp. plochy a popisky jednotlivých prvků. Nástroje uživatelské grafiky jsou následující:

 - výběr prvku uživatelské grafiky - umožňuje editovat nakreslený prvek uživatelské grafiky,
 - posun prvku uživatelské grafiky - umožňuje posunout prvek uživatelské grafiky,
 - nakreslit bod - v panelu "Uživatelská grafika" se zobrazují názvy vytvořených bodových prvků,
 - nakreslit linii - v panelu "Uživatelská grafika" se zobrazují názvy a délky vytvořených liniových prvků,
 - nakreslit polygon - v panelu "Uživatelská grafika" se zobrazují názvy, obvody a plochy vytvořených plošných prvků.
 Nápověda - Mapy


